


为实体机ubuntu 安装redis 打个样
虚拟机为pve 下的ubuntu 22.04
更新系统
sudo apt update编译安装之前,先安装环境
sudo apt install -y gcc g++ make tcl wget,Redis 是 C 语言编写的源码程序,Ubuntu 系统原生不带编译工具,必须提前装好环境
gcc(C 编译器)
Redis 全部代码使用 C 语言编写;系统看不懂 C 语言源码,gcc 负责把源码翻译成服务器可以识别的二进制可执行程序,没有 gcc 就无法编译 redis‑server。
g++(C++ 编译器)
Redis 部分附属组件依赖 C++ 环境,同时编译依赖库会调用它。
make(编译自动化工具)
源码文件夹内自带
Makefile编译脚本,make 会自动按照官方写好的规则,一键执行编译、文件配置,不用你手动一条一条编译代码。tcl
Redis 编译结束以后会执行自带的单元测试脚本,检验编译出来的程序有没有 BUG;测试脚本基于 tcl 语言运行,缺少它编译阶段会报错。
wget
命令行下载工具,用来从官网下载 Redis‑7.2.5 的源码压缩包;当然也可以手动上传安装包,那就可以不用 wget。
下载redis
下载redis
wget https://download.redis.io/releases/redis-7.2.5.tar.gz
tar -zxvf redis-7.2.5.tar.gz   解压

cd redis-7.2.5 进入文件夹
然后直接make
make 的作用
1. 底层原理
Redis 是一堆零散的 .c 源代码文件,如果手动编译,你需要一条一条敲很长的 gcc 命令,几十上百个源文件挨个编译、链接,工作量极大。
文件夹里的 Makefile 就是一份官方提前写好的「操作清单」。
make 工具就读取这份清单,自动完成:
调用 gcc 编译全部 C 源码
编译 deps 里面的第三方依赖(内存管理器、Lua 等)
把零散的编译结果链接成可执行程序 redis‑server、redis‑cli
2. 简单比喻
Makefile = 流水线作业说明书
make = 流水线操作工
gcc = 切割机
你只需要喊一声 make,操作工就照着说明书,自动跑完整套加工。
3. 你这条目录的流程
bash
# 进入源码文件夹
cd ~/redis‑7.2.5
# 自动编译源码
make
# 将编译好的程序安装到 /usr/local/redis
sudo make install PREFIX=/usr/local/redis
make:只编译,文件还停留在 src 文件夹
make install:把编译好的程序复制到系统目录,配置环境可以全局调用
下载的是 C 语言源代码、配置文件、脚本,是一堆 “原始代码素材”;
Linux 系统不能直接识别 .c 源代码,必须经过 gcc 编译器翻译成服务器能运行的二进制程序。
完整链路梳理
wget从官网下载:redis‑7.2.5.tar.gz(压缩后的源码包)tar解压 → 得到 redis‑7.2.5 源码文件夹,里面全是源代码make读取 Makefile,调用 gcc,把一堆源码编译成可执行程序(redis‑server、redis‑cli)make install将编译完成的程序搬运到系统目录
简单类比
下载的相当于布料原材料;
make、gcc 就是缝纫机,把布料加工成可以直接穿的成品衣服(可运行的 Redis 程序)。
安装到指定文件夹
sudo sudo make install PREFIX=/usr/local/redis
创建目录、配置文件都需要管理员权限
shitou@server:~/redis-7.2.5$ sudo mkdir -p /usr/local/redis/{conf,data,log}
shitou@server:~/redis-7.2.5$ ls
00-RELEASENOTES     CONTRIBUTING.md  INSTALL    README.md   runtest-cluster    SECURITY.md    tests
BUGS                COPYING          Makefile   redis.conf  runtest-moduleapi  sentinel.conf  TLS.md
CODE_OF_CONDUCT.md  deps             MANIFESTO  runtest     runtest-sentinel   src            utils
shitou@server:~/redis-7.2.5$ pwd
/home/shitou/redis-7.2.5
文件夹下的文件释义
00‑RELEASENOTES:版本更新日志,记录该版本新增功能、漏洞修复、改动说明
BUGS:官方 bug 提交说明、问题反馈渠道
CODE_OF_CONDUCT.md:开源项目开发者行为规范
CONTRIBUTING.md:开发者提交代码、参与 Redis 开源项目的教程
COPYING:BSD‑3‑Clause 开源许可证,规定 Redis 的使用、修改、分发权限
INSTALL:官方源码编译安装教程
Makefile:编译配置脚本,make命令依靠这个文件完成源码编译
MANIFESTO:Redis 项目理念、设计宗旨文档
README.md:项目简介、基础使用说明
redis.conf:Redis 主配置文件,最核心文件;端口、密码、持久化、内存上限全部在此配置
runtest:一键运行全部单元测试脚本
runtest‑cluster:Redis 集群模式专项测试脚本
runtest‑moduleapi:Redis 扩展模块接口测试
runtest‑sentinel:哨兵模式故障转移功能测试脚本
sentinel.conf:Redis‑Sentinel(哨兵)专属配置文件,用于主从高可用
SECURITY.md:安全漏洞上报方式、安全相关说明
TLS.md:Redis 开启 SSL/TLS 加密连接的配置文档
文件夹
deps:第三方依赖源码,包含 jemalloc 内存库、lua 脚本库、hiredis 等底层组件,编译时会一并构建
src:核心源码目录
存放 redis‑server、redis‑cli、redis‑sentinel 等程序 C 语言源码,编译生成的二进制程序也会输出到 src 下面
tests:全套测试用例,tcl 测试脚本,用来检验编译之后 Redis 功能是否正常
utils:实用工具脚本,包含开机启动脚本、性能调试工具、安装辅助脚本
shitou@shitou:~/redis-7.2.5$ sudo mkdir -p /usr/local/redis/{conf,data,log}
shitou@shitou:~/redis-7.2.5$ sudo cp redis.conf /usr/local/redis/conf/
shitou@shitou:~/redis-7.2.5$ sudo nano /usr/local/redis/conf/redis.conf
shitou@shitou:~/redis-7.2.5$
然后修改配置文件
# Examples:
#
# bind 192.168.1.100 10.0.0.1     # listens on two specific IPv4 addresses
# bind 127.0.0.1 ::1              # listens on loopback IPv4 and IPv6
# bind * -::*                     # like the default, all available interfaces
#
# ~~~ WARNING ~~~ If the computer running Redis is directly exposed to the
# internet, binding to all the interfaces is dangerous and will expose the
# instance to everybody on the internet. So by default we uncomment the
# following bind directive, that will force Redis to listen only on the
# IPv4 and IPv6 (if available) loopback interface addresses (this means Redis
# will only be able to accept client connections from the same host that it is
# running on).
#
# IF YOU ARE SURE YOU WANT YOUR INSTANCE TO LISTEN TO ALL THE INTERFACES
# COMMENT OUT THE FOLLOWING LINE.
#
# You will also need to set a password unless you explicitly disable protected
# mode.
# ~~~~~~~~~~~~~~~~~~~~~~~~~~~~~~~~~~~~~~~~~~~~~~~~~~~~~~~~~~~~~~~~~~~~~~~~
bind 127.0.0.1 -::1 这个地方不需要改动,
因为我这个是3Gb的服务器,所以限制为1400mb 根据自己的服务器内存,相应设置限制其内存
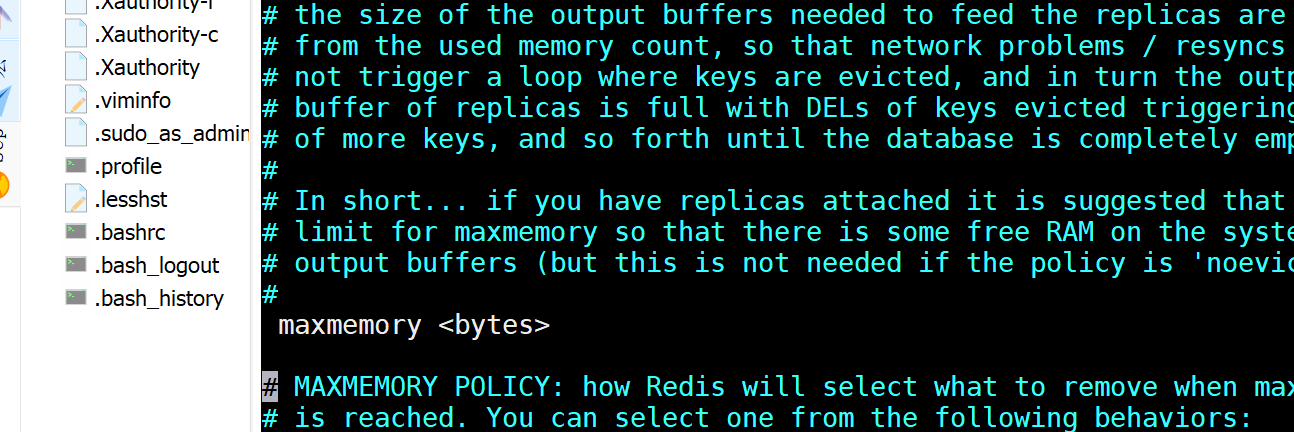
# the size of the output buffers needed to feed the replicas are subtracted
# from the used memory count, so that network problems / resyncs will
# not trigger a loop where keys are evicted, and in turn the output
# buffer of replicas is full with DELs of keys evicted triggering the deletion
# of more keys, and so forth until the database is completely emptied.
#
# In short... if you have replicas attached it is suggested that you set a lower
# limit for maxmemory so that there is some free RAM on the system for replica
# output buffers (but this is not needed if the policy is 'noeviction').
#
 maxmemory 1600mb

# MAXMEMORY POLICY: how Redis will select what to remove when maxmemory
# is reached. You can select one from the following behaviors:
#
# volatile-lru -> Evict using approximated LRU, only keys with an expire set.
# allkeys-lru -> Evict any key using approximated LRU.
# volatile-lfu -> Evict using approximated LFU, only keys with an expire set.
# allkeys-lfu -> Evict any key using approximated LFU.
# volatile-random -> Remove a random key having an expire set.
# allkeys-random -> Remove a random key, any key.
# LRU取样数,默认5就够用,不用改动
# maxmemory-samples 5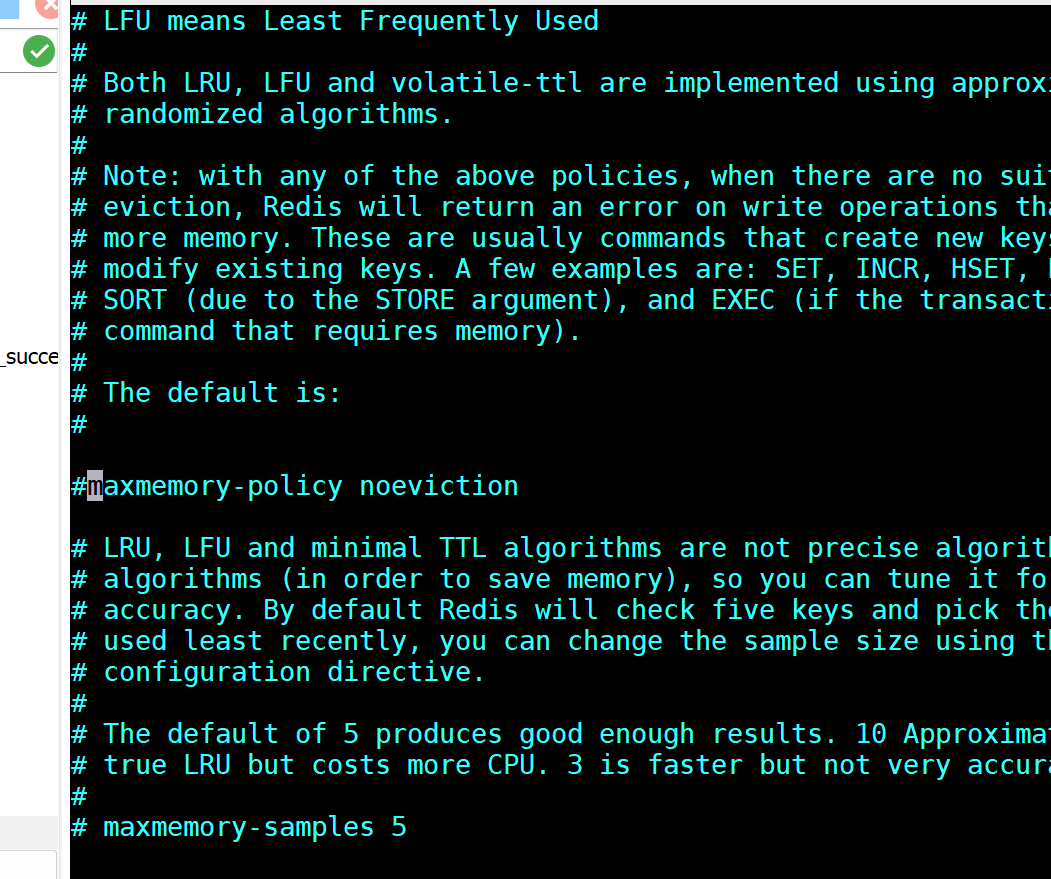
修改
# Note: with any of the above policies, when there are no suitable keys for
# eviction, Redis will return an error on write operations that require
# more memory. These are usually commands that create new keys, add data or
# modify existing keys. A few examples are: SET, INCR, HSET, LPUSH, SUNIONSTORE,
# SORT (due to the STORE argument), and EXEC (if the transaction includes any
# command that requires memory).
#
# The default is:
#
# maxmemory-policy noeviction

# LRU, LFU and minimal TTL algorithms are not precise algorithms but approximated
# algorithms (in order to save memory), so you can tune it for speed or
# accuracy. By default Redis will check five keys and pick the one that was
# used least recently, you can change the sample size using the following
# configuration directive.
#
# The default of 5 produces good enough results. 10 Approximates very closely
# true LRU but costs more CPU. 3 is faster but not very accurate.
#
# maxmemory-samples 5
6种常用策略通俗解释
allkeys‑lru(现在要用的,最适合普通缓存)
在全部缓存里面,删掉最久没人访问过的数据
日常业务缓存首选,闲置最久的数据优先清掉。
volatile‑lru
只清理设置过过期时间的缓存,没设置过期的永远不动
allkeys‑lfu
删掉平时被读取次数最少的数据,冷门数据优先清理
volatile‑lfu
只在带过期时间的 key 里,删掉访问次数最少的
volatile‑ttl
优先删掉快要到期、剩余存活时间最短的缓存
noeviction(Redis 出厂默认)
内存满了直接拒绝新增数据、报错,一条数据也不会删
非常不适合缓存场景,缓存满了直接无法写入,所以咱们不用这个。
普通项目缓存 → allkeys‑lru(优先清长时间不用的)
有大量带过期时间的临时数据 → volatile‑lru
本机做业务缓存,固定填写:
ini
maxmemory-policy allkeys-lru然后是持久化
然后是持久化
开启AOF日志持久化,重启之后数据还在
appendonly yes
保持默认
# - appendonly.aof.manifest as a manifest file.
appendfilename "appendonly.aof"
选默认
# 每秒同步一次,性能和安全平衡 appendfsync everysec
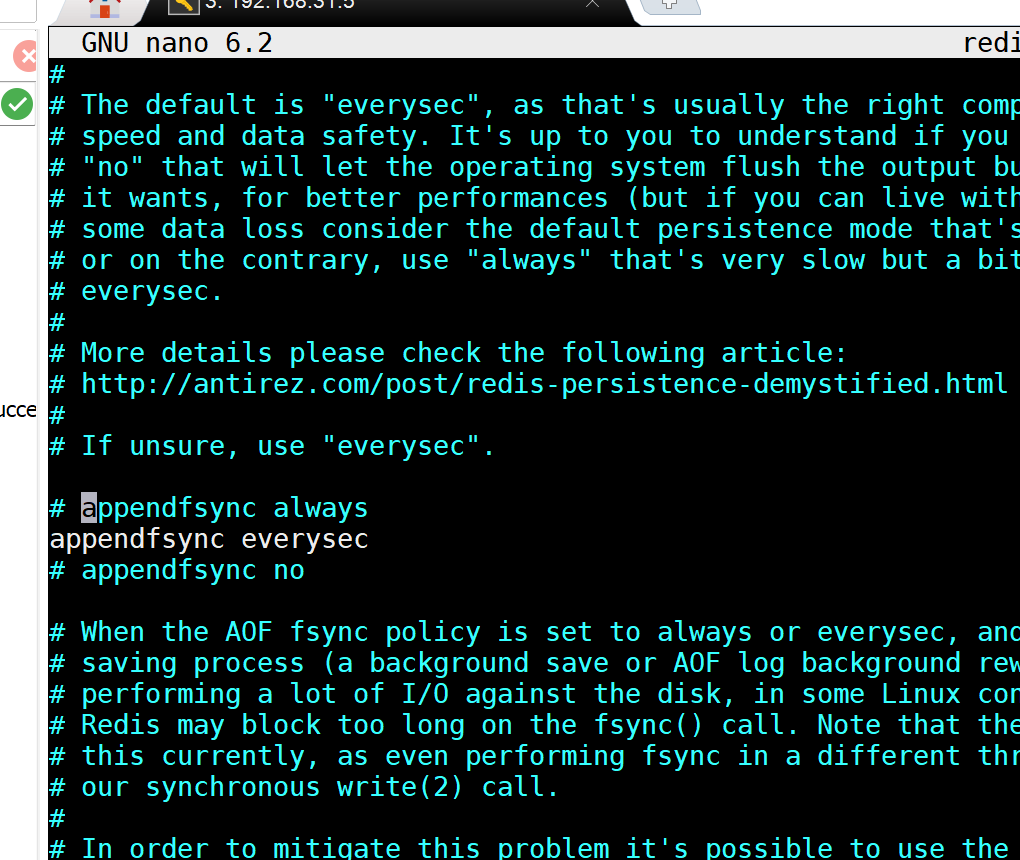
appendfsync该参数用来控制 AOF 持久化日志刷写到硬盘的频率,一共有三个选项:
always
每执行一条写入命令,立刻强制写入磁盘。
优点:断电几乎不会丢失数据
缺点:磁盘 IO 压力最大,性能最慢
everysec(你现在开启的,默认最优方案,直接保留)
每秒把缓存里的日志一次性写入硬盘
性能和安全性均衡;极端断电最多丢失 1 秒内的数据,日常缓存首选
ini
appendfsync everysec
no
交给操作系统自主决定什么时候写入磁盘
Redis 性能最快,但宕机时有可能丢失较多缓存数据
你整套 AOF 完整配置,直接照着确认即可
ini
appendonly yes
appendfsync everysec
不需要改动当前 everysec,这是单机缓存最稳妥的设置。
三个核心 AOF 参数简单总结
表格
配置 安全程度 运行速度 适用场景
always 最高 最慢 金融类、零丢失业务
everysec 适中 均衡 你的本地缓存,推荐
no 最低 最快 追求极致速度,可接受丢数据daemonize yes
# 不需要远程连接就不用设置密码;以后需要外网访问再开启
# requirepass 你的密码 # 后台守护进程运行
daemonize yes
作用
daemonize yes:开启守护进程模式,Redis 在后台静默运行,不会占用你的终端窗口,关闭 SSH 终端服务也不会停止。
daemonize no:前台模式,终端窗口关闭 Redis 就直接退出。
你使用 systemctl 管理服务的时候,推荐开启 daemonize yes
2. 关于密码 requirepass
你现在仅本地 127.0.0.1 访问、没有对外开放端口:不需要配置密码
后续如果需要公网远程连接,去掉注释符号 #,设置密码:
ini
requirepass 自定义你的密码

3. 当前你整套最终可用配置汇总
ini
bind 127.0.0.1 -::1
daemonize yes
maxmemory 1600mb
maxmemory-policy allkeys-lru
appendonly yes
appendfsync everysec

4. 保存重启流程
sudo nano /etc/redis/redis.conf 编辑配置
修改完毕 Ctrl+O →回车保存,Ctrl+X 退出
重启服务:
bash
sudo systemctl restart redis
# By default Redis does not run as a daemon. Use 'yes' if you need it.
# Note that Redis will write a pid file in /var/run/redis.pid when daemonized.
# When Redis is supervised by upstart or systemd, this parameter has no impact.
daemonize yes

# If you run Redis from upstart or systemd, Redis can interact with your
# supervision tree. Options:
#   supervised no      - no supervision interaction
#   supervised upstart - signal upstart by putting Redis into SIGSTOP mode
#                        requires "expect stop" in your upstart job config
#   supervised systemd - signal systemd by writing READY=1 to $NOTIFY_SOCKET
#                        on startup, and updating Redis status on a regular
#                        basis.
#   supervised auto    - detect upstart or systemd method based on
#                        UPSTART_JOB or NOTIFY_SOCKET environment variables
# Note: these supervision methods only signal "process is ready."
#       They do not enable continuous pings back to your supervisor.
sudo nano /etc/sysctl.conf
shitou@server:/usr/local/redis/conf$ sudo sysctl -p
vm.overcommit_memory = 1
shitou@server:/usr/local/redis/conf$ /usr/local/redis/bin/redis-server /usr/local/redis/conf/redis.conf --daemonize yes
shitou@server:/usr/local/redis/conf$
pidfile /var/run/redis_6379.pid
目录存储 pid 文件,重启之后 pid 文件不会丢失
# and should be used instead.
pidfile /var/run/redis_6379.pid
# Specify the server verbosity level.
# This can be one of:
# debug (a lot of information, useful for development/testing)
# verbose (many rarely useful info, but not a mess like the debug level)
# notice (moderately verbose, what you want in production probably)
# warning (only very important / critical messages are logged)
# nothing (nothing is logged)
loglevel notice
# Specify the log file name. Also the empty string can be used to force
# Redis to log on the standard output. Note that if you use standard
# output for logging but daemonize, logs will be sent to /dev/null
logfile "/usr/local/redis/log/redis.log"
logfile "/usr/local/redis/log/redis.log"
存放的日志
dir /usr/local/redis/data
# Note that you must specify a directory here, not a file name.
dir /usr/local/redis/data
工作目录(你现在需要修改的配置)
注释翻译
这是 Redis 工作目录。RDB 快照文件、AOF 持久化日志都会存放于此;此处必须填写文件夹路径,不能填写文件名称
./代表当前目录,也就是启动 redis‑server 命令时所在的文件夹,路径不稳定,非常容易出错
核心配置已经全部调整完毕,核对一遍完整清单
bind 127.0.0.1 -::1仅本机访问,保持原样maxmemory 1600mb最大缓存内存maxmemory‑policy allkeys‑lru内存淘汰策略appendonly yes开启 AOF 持久化appendfsync everysec每秒落地磁盘,默认最优无需改动pidfile /var/run/redis_6379.pidlogfile "/usr/local/redis/log/redis.logdir /usr/local/redis/data
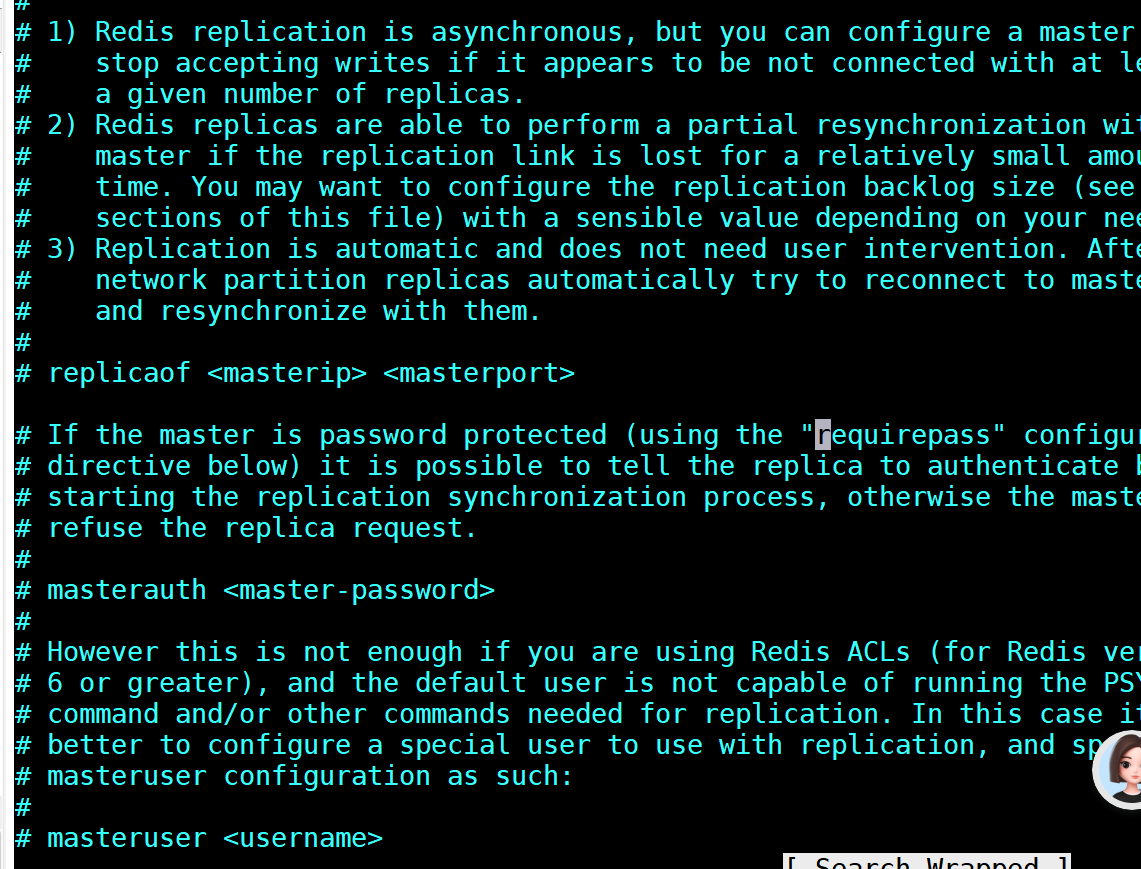
/段为主从复制(主从同步)配置板块解析
三条核心注释解读
异步复制:Redis 主节点写入数据之后,异步同步给从节点;可配置最低在线从机数量,不达标就禁止主库接收新写入
断点续传:网络短暂断开不需要全量重传,依靠复制积压缓冲区,只同步断开期间新增的数据
自动重连:网络恢复之后从节点会主动连接主节点、自动完成数据同步
三个关键配置项
replicaof <masterip> <masterport>
开启从节点模式,填写主库 IP + 端口,本机就会变成它的副本(从库)
单机环境不需要开启主从,整行保持注释即可
masterauth <master‑password>
当主库设置了密码(你的
requirepass 123456),从库配置该项填入主库密码,才能连上主节点完成同步
masteruser <username>
Redis6 + 新增 ACL 权限账号体系,主库设置专属复制账号的时候填写,单机普通密码模式不需要配置
直接在配置文件末尾,手动新增一行就行
ini
requirepass 123456
配置文件末尾新加参数同样可以生效,redis 会从上往下读取设置
ini
2核8g内存的755针,服务器整套配置整理
bind 0.0.0.0
port 6379
daemonize yes
pidfile /usr/local/redis/redis.pid
logfile "/usr/local/redis/log/redis.log"
dir /usr/local/redis/data
maxmemory 4g
maxmemory-policy allkeys-lru
rdb-del-sync-files no
requirepass 123456
关闭保存完整操作步骤
按下快捷键
Ctrl+O,敲击回车确认写入保存按下
Ctrl+X,退出 nano 编辑器
最后一步,重启 Redis 加载新配置,终端执行这两条命令
bash
sudo systemctl daemon-reload
sudo systemctl restart redis
简单测试是否正常启动
bash
redis-cli源码手动编译安装 Redis(路径 /usr/local/redis),不是 apt 一键安装:
Unit redis.service not found:没有创建 systemd 服务文件,所以 systemctl 无法管理启动、重启
redis‑cli: command not found:编译安装的程序不在系统环境变量
第一步:先安装客户端工具(临时可用)
bash
sudo apt install redis-tools
第二步:手动启动 Redis(源码版启动命令)
bash
/usr/local/redis/bin/redis-server /usr/local/redis/conf/redis.conf
加上 --daemonize yes 就会后台运行:
bash
/usr/local/redis/bin/redis-server /usr/local/redis/conf/redis.conf --daemonize yes
第三步:配置 systemd 开机服务(一劳永逸,推荐做)
创建服务文件
bash
sudo nano /lib/systemd/system/redis.service
粘贴下面全部内容
ini
[Unit]
Description=Redis Server
After=network.target
[Service]
Type=forking
ExecStart=/usr/local/redis/bin/redis-server /usr/local/redis/conf/redis.conf
ExecStop=/usr/local/redis/bin/redis-cli shutdown
Restart=always
[Install]
WantedBy=multi-user.target
保存退出,重载系统服务
bash
sudo systemctl daemon-reload
现在就可以正常启动、重启、停止
bash
sudo systemctl start redis
sudo systemctl restart redis
sudo systemctl stop redis
第四步:把 redis 命令加入全局环境变量
bash
sudo ln -s /usr/local/redis/bin/redis-server /usr/local/bin/redis-server
sudo ln -s /usr/local/redis/bin/redis-cli /usr/local/bin/redis-cli
之后直接输入 redis‑cli 就可以进入终端。sudo sysctl vm.overcommit_memory=1
永久开启(写入系统配置,永久生效)
编辑内核配置文件
bash
sudo nano /etc/sysctl.conf
在文件最末尾添加一行
ini
vm.overcommit_memory = 1
保存 Ctrl+O →回车,Ctrl+X退出
加载新配置
bash
sudo sysctl -p
后台启动 Redis
你现在直接执行是前台运行,终端关闭 Redis 就停止,执行这条开启守护进程后台常驻:
bash
/usr/local/redis/bin/redis-server /usr/local/redis/conf/redis.conf --daemonize yes
检查是否成功运行
bash
ps -ef | grep redis-server
之后你就可以连接客户端:
bash
/usr/local/redis/bin/redis-cli shitou@server:/usr/local/redis/conf$ps -ef | grep redis-server
shitou 35508 28881 0 15:02 pts/1 00:00:00 grep --color=auto redis-server
shitou@server:/usr/local/redis/conf$ /usr/local/redis/bin/redis-cli
Could not connect to Redis at 127.0.0.1:6379: Connection refused
not connected>
not connected>
shitou@server:/usr/local/redis/conf$
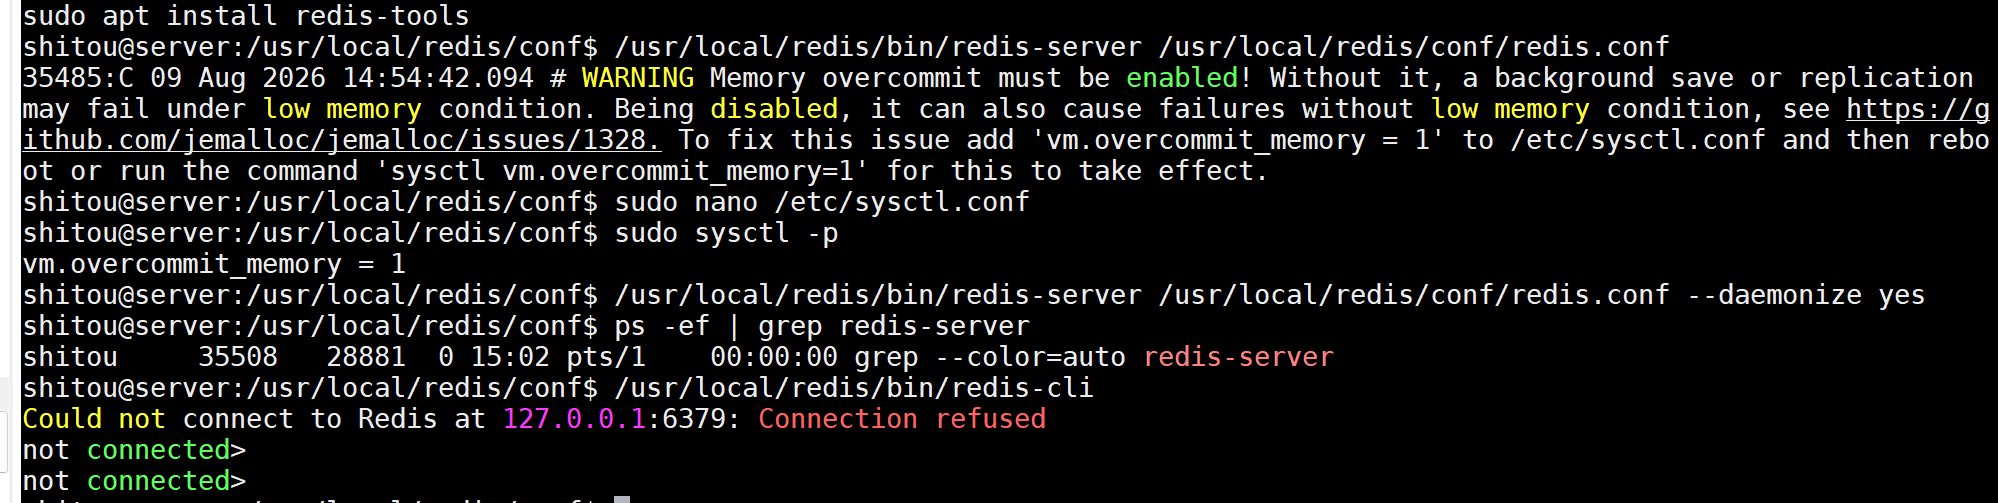
警告弹出解释
1、为什么弹出内存警告(和前台 / 后台启动没关系)
Linux 默认内存分配策略:
vm.overcommit_memory=0:内核严格校验可用内存,申请内存不够就直接拒绝程序
Redis 在做持久化(RDB 快照)的时候,会fork 复制一份完整进程用来写入磁盘
就算你的内存够用,fork 瞬间系统也会误以为内存翻倍、直接拒绝,Redis 就会崩溃报错。
所以 Redis 强制要求开启内存宽松模式 vm.overcommit_memory=1,允许系统预分配虚拟内存,规避 fork 快照失败。
不管前台启动还是后台启动,这条警告都会出现
2、前台、后台启动区别
现在的启动方式 = 前台运行
bash
/usr/local/redis/bin/redis-server /usr/local/redis/conf/redis.conf
Redis 占用当前终端窗口,窗口关掉、断开 SSH 连接,Redis 服务直接停止。
后台守护进程启动(推荐)
两种方式任选其一
方式①:启动命令追加参数
bash
/usr/local/redis/bin/redis-server /usr/local/redis/conf/redis.conf --daemonize yes
方式②:配置文件内写死 daemonize yes,以后启动默认后台常驻
最简操作顺序
先解决内核警告(一次性设置)
bash
sudo sysctl vm.overcommit_memory=1
后台启动 Redis

/usr/local/redis/bin/redis-server /usr/local/redis/conf/redis.conf --daemonize yes
连接客户端

/usr/local/redis/bin/redis-cli
通俗总结
内存警告:系统内核参数问题,不关启动模式的事
前台启动:Redis 绑定你的终端;后台启动:Redis 在服务器后台静默运行,断开 SSH 也不会关闭
警告和后续处理如图:
pve 虚拟机ubuntu 编译安装redis 7.2.5
本文采用 CC BY-NC-SA 4.0 许可协议,转载请注明出处。
评论交流
欢迎留下你的想法